LabelsGuide
In Mold Labeling: Injection & Blow Molding Film Fusion
How in mold labeling places, pins, and fuses pre-printed polymer film during injection molding, blow molding, and thermoforming for mono-material packaging.
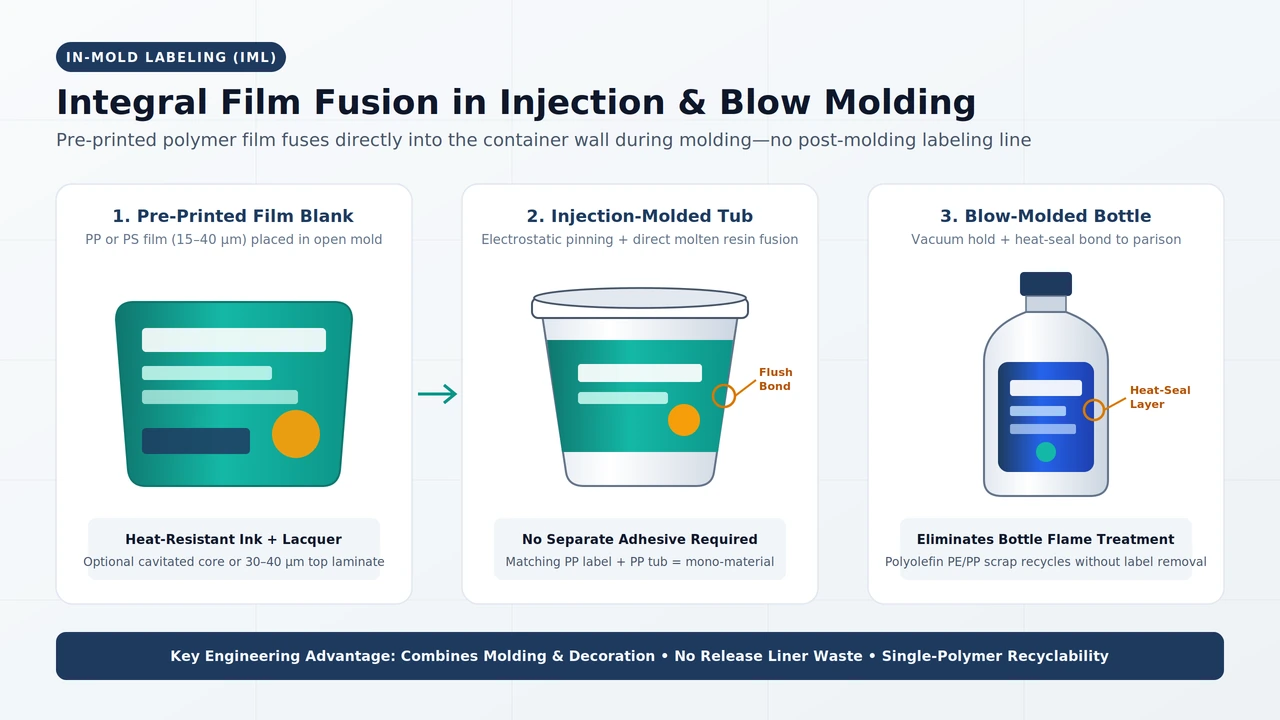
In mold labeling places a pre-printed paper or plastic label inside an open blow-molding, injection-molding, or thermoforming cavity before the container is formed. During the molding cycle, molten polymer or an inflated parison bonds directly with the label so it becomes an integral part of the finished pre-decorated container, removing downstream labeling lines and enabling mono-material polyolefin recycling.
Within the broader packaging labels technical hub, in-mold labeling (IML) stands apart from post-molding decoration because container forming and graphic application occur in the same press cycle. Combining molding and decoration cuts total manufacturing cost, although inserting labels into the open tool can add cycle time compared with molding undecorated parts.
How does the in-mold labeling process place, hold, and fuse a printed film blank?
An automated labeling robot places a pre-printed label blank into the open blow-molding, injection-molding, or thermoforming cavity and holds it against the wall using vacuum, compressed air, or static electricity. When the mold closes, molten resin or an inflated parison fuses the label permanently into the container wall, while vision systems verify accurate placement and correctness.
The in-mould labelling process runs in four repeatable steps inside every molding cycle. First, the robotic end-of-arm tooling picks a pre-printed blank from a magazine or reel-fed unit. Second, the robot enters the open mold and secures the blank flush against the cavity wall using vacuum ports, compressed air, or electrostatic attraction. Third, the mold closes and injects molten polymer—or inflates a molten parison—so heat and pressure fuse the film to the forming container. Fourth, the mold opens, the pre-decorated container ejects ready for the product filling line, and vision cameras confirm label position and artwork accuracy.
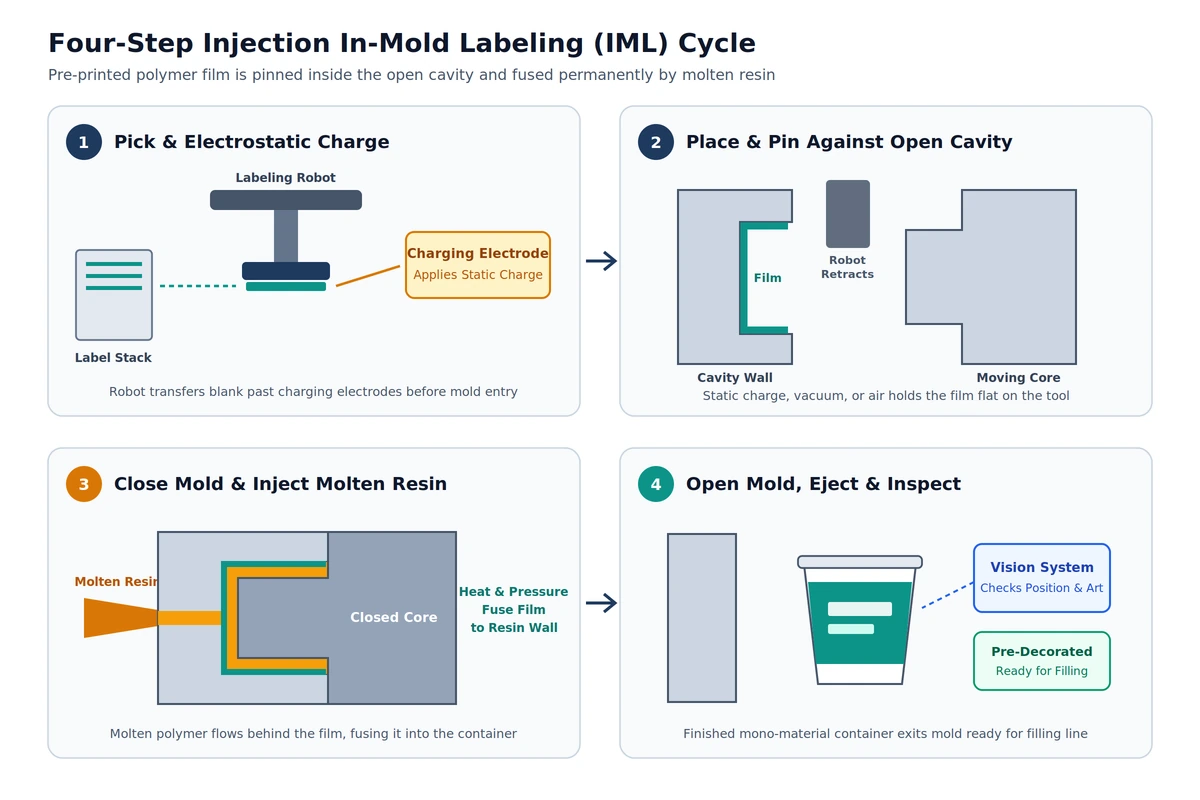
Most label-placement robots are not tied to a single molding press brand and can operate on modern machines equipped with fast clamping systems. Because the label becomes an integral part of the molded wall rather than sitting on top of a finished package, there is no separate downstream labeling station to feed or clean.
How does injection molding IML differ from extrusion blow molding IML?
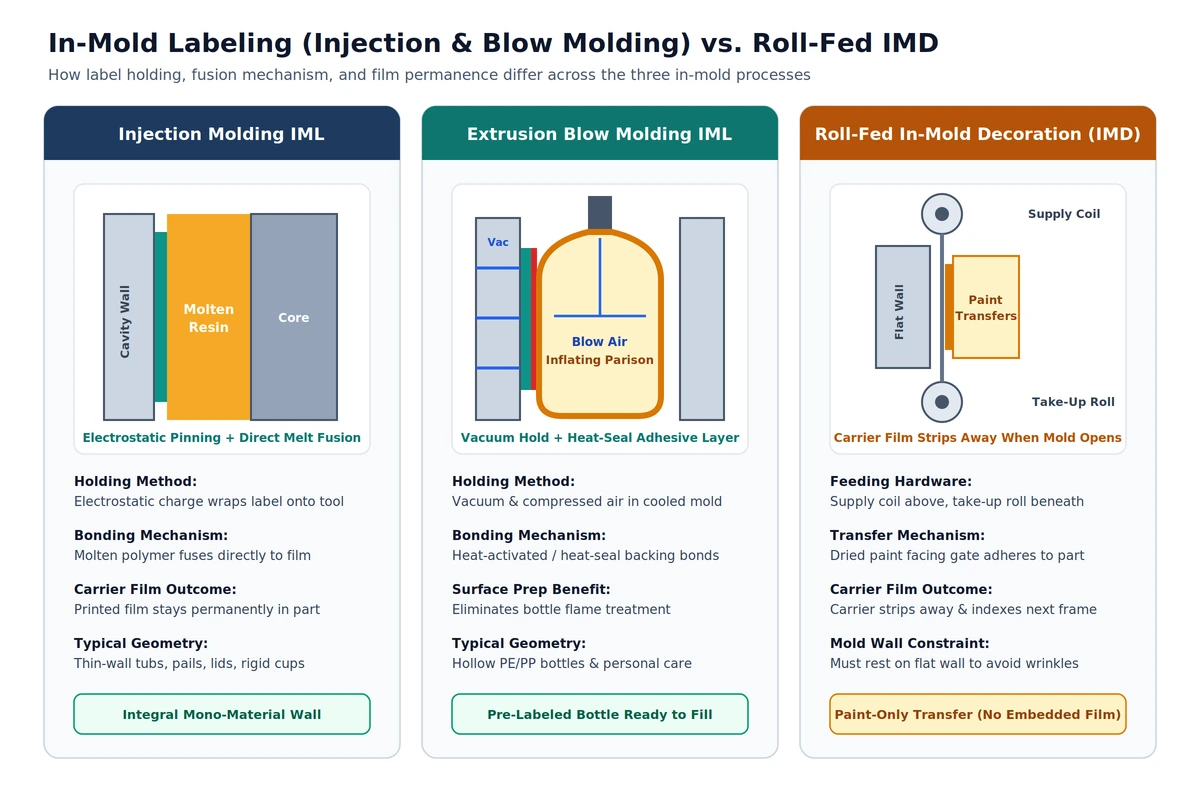
In injection molding, electrostatic charging electrodes charge the label during robotic transfer so it wraps tightly onto the tool before molten resin fuses with the film. In extrusion blow molding, vacuum and compressed air hold the label in a cooled split mold while an inflating parison bonds to a heat-seal backing, eliminating bottle flame treatment.
Electrostatic pinning in injection molding
Electrostatic pinning relies on charging electrodes positioned along the robot transfer path. As the labeling robot carries the film blank toward the open injection cavity, the electrodes apply a static charge to the label. When the robot positions the blank on the cavity surface and releases it, electrostatic attraction makes the film wrap flat against the grounded steel tool so the incoming melt flows cleanly behind the substrate rather than displacing or folding it.
Vacuum holding and heat-seal bonding in extrusion blow molding
According to blow molding engineering classifications, the three primary blow-molding routes are extrusion blow molding, injection blow molding, and injection stretch blow molding. In extrusion blow molding—run on continuous rotary wheel and shuttle equipment or intermittent reciprocating screw and accumulator head machinery—molten plastic is extruded into a hollow tube called a parison, captured in a cooled metal mold, and inflated with compressed air into the finished bottle shape.
Because an inflating parison exerts lower localized shear and thermal mass than high-pressure injection melt, blow-molding IML labels traditionally coat the reverse side of the substrate with a heat-seal layer, also classified under heat-activated adhesives in container labeling. Heat from the inflating parison activates this heat-seal backing to bond the label to the bottle wall. This construction eliminates the separate flame-treatment step otherwise needed to achieve adequate adhesion on polyolefin bottles prior to post-molding labeling.
| Process route | Label holding method | Bonding mechanism | Machine format | Typical containers |
|---|---|---|---|---|
| Injection molding IML | Electrostatic charging electrodes, vacuum, or compressed air | Molten polymer flows behind film and fuses directly into wall | Multi-cavity injection press with fast-clamping robot | Thin-wall tubs, rigid cups, lids, and pails |
| Extrusion blow molding IML | Vacuum and compressed air in cooled split mold | Inflated hollow parison bonds to reverse-side heat-seal layer | Continuous rotary wheel/shuttle or intermittent reciprocating screw/accumulator head | Hollow polyethylene and polypropylene bottles |
| Thin-gauge thermoforming IML | Robotic or reel-fed cavity placement | Formed polymer sheet bonds with pre-placed label in mold | High-efficiency reel-fed thermoforming lines | Disposable cups, containers, lids, trays, and clamshells |
Why are thin-wall containers, rigid cups, and polyolefin bottles the primary in-mold labeling examples?
In-mold labeling was first developed by Owens-Illinois in cooperation with Procter & Gamble to supply pre-labeled Head & Shoulders shampoo bottles ready for the filling line, and it later expanded into high-efficiency injection molding and thin-gauge thermoforming. High-volume polyolefin tubs, cups, lids, trays, and bottles amortize mold tooling expense while enabling mono-material recycling without label removal.
Origin in blow-molded bottles and expansion into thin-wall tubs
IML began in blow molding so filled-bottle plants could receive pre-decorated bottles straight onto the product filling line. Subsequent developments in injection molding and thin-gauge thermoforming—which manufactures disposable cups, containers, lids, trays, blisters, and clamshells for food, medical, and general retail packaging—paired reel-fed and robotic label insertion with multi-cavity tooling to boost overall labeling efficiency.
Mono-material polyolefin recycling vs. PSA, wet glue, and shrink sleeve labels
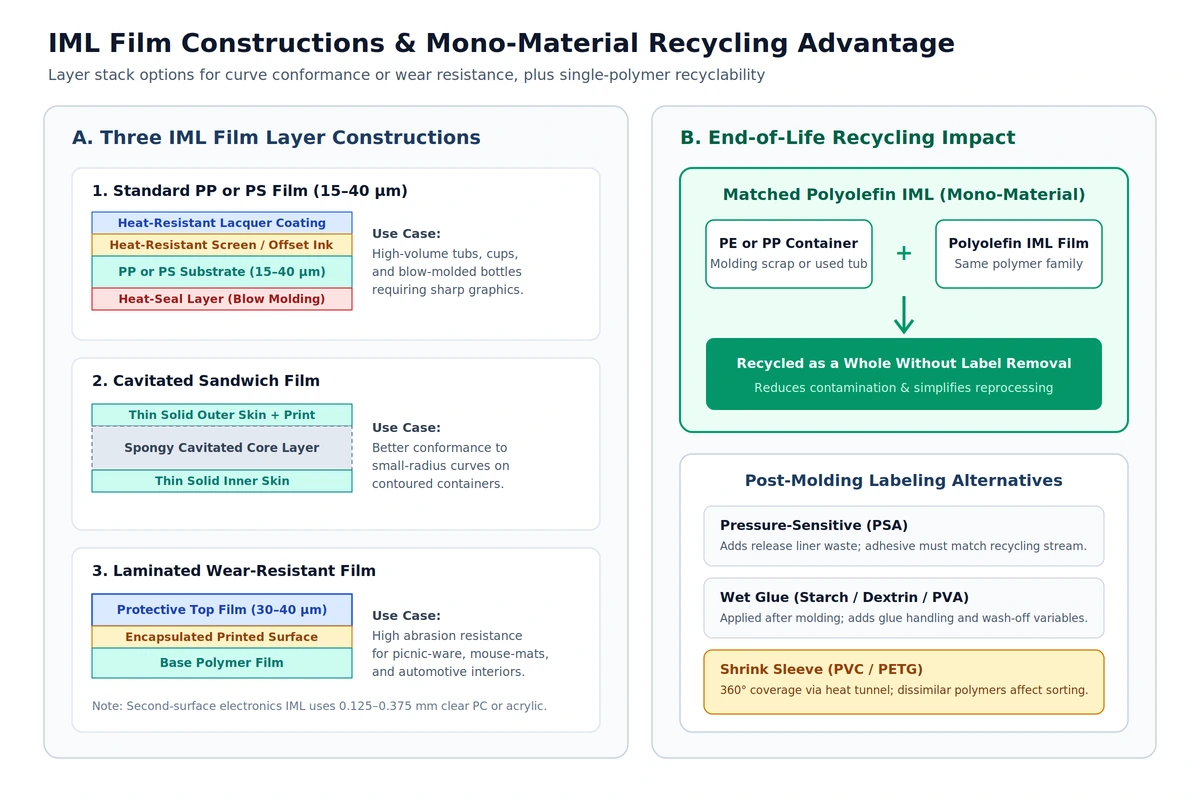
When a label stays attached to a container at end of life, the label material and adhesive should not hinder recyclability. In injection molding part design, monomaterials allow assemblies to be recycled as a whole, reducing contamination and simplifying end-of-life processing. Pairing polyolefin IML substrates—such as synthetic papers like Polyart—with polyethylene or polypropylene containers allows both in-plant molding scrap and finished containers to be recycled without removing the label first.
Post-molding decoration methods introduce additional materials and line steps that affect sorting and reprocessing. Pressure-sensitive adhesives (PSA) apply with light pressure without heat activation and typically rely on release liners to protect the adhesive and assist handling. Wet glue bottle labeling uses separate bottle labeling adhesive chemistries such as starch, dextrin, PVA, or water-moistenable gummed adhesives; for a detailed comparison of those two post-molding routes, see our pressure-sensitive vs wet-glue labels comparison. Shrink sleeve labels deliver full 360-degree coverage using polyvinyl chloride (PVC) or polyethylene terephthalate glycol-modified (PETG) films applied by automated equipment and heated in a shrink tunnel or oven. Because labels, adhesives, coatings, inks, and multilayer structures can all affect post-consumer sorting and reprocessing, package recyclability depends on the finished container composition rather than the base resin alone.
| Decoration method | Attachment & adhesive | Downstream line hardware | Common label materials | Recycling stream impact |
|---|---|---|---|---|
| In-mold labeling (IML) | Fused in mold via molten resin or heat-seal backing | None after molding; robot runs at molding press | Polyolefin, polypropylene, polystyrene, or paper | Matched polyolefin label and PE/PP container recycle as a whole without label removal |
| Pressure-sensitive (PSA) | Self-stick adhesive applied with light pressure | Dispensing applicator and spent liner rewinder | Paper or polymer face with silicone release liner | Liner requires separate route; adhesive and face should suit target stream |
| Wet glue (cold glue) | Liquid starch, dextrin, PVA, or gummed bottle labeling adhesive | Cold-glue labeller, glue pallets, and washdown | Pre-cut paper labels | Separate adhesive chemistry must release or stay compatible in reprocessing |
| Shrink sleeve labels | Film tube shrunk mechanically tight by heat | Automated sleeve applicator plus shrink tunnel or oven | Full 360-degree PVC or PETG shrink film | Dissimilar sleeve polymers can complicate sorting and reprocessing |
What ink heat-resistance and film structures govern the IML label printing process?
Standard in-mold labels use 15 to 40 micrometre polypropylene or polystyrene film printed by screen printing or offset lithography with heat-resistant inks and lacquer. Contoured curves use cavitated sandwich films, high-wear items add a 30 or 40 micrometre protective laminate, and electronics IML prints behind 0.125 to 0.375 mm clear polycarbonate or acrylic.
Every layer in an IML label must survive molding heat and flow pressure without smearing, shrinking unevenly, or losing adhesion. The original IML construction pairs a reverse-side heat-seal layer with a substrate printed with heat-resistant ink and sealed under a heat-resistant lacquer coating. Multi-color screen printing and offset lithography are widely used because they deliver higher graphic resolution than alternative direct container decorating methods. For buyers evaluating paper versus synthetic face stocks on post-molding lines, compare how facestock layers differ in our paper vs film label materials guide.
| IML film construction | Typical thickness | Structural layers | Primary performance role |
|---|---|---|---|
| Standard PP or PS film | 15 to 40 micrometres | Heat-resistant lacquer, heat-resistant ink, PP or PS substrate, optional heat-seal layer | General-purpose injection and blow-molded rigid packaging |
| Cavitated sandwich film | Multi-layer sandwich | Spongy cavitated core bonded between two very thin solid outer layers | Improved conformance around small-radius curves on contoured containers |
| Laminated wear-resistant film | 30 or 40 micrometre protective top film | Second protective film laminated over the printed surface | High abrasion resistance for picnic-ware, mouse-mats, and internal automotive components |
| Second-surface electronics film | 0.125 to 0.375 mm (0.005 to 0.015 in) | Back-printed clear polycarbonate or acrylic substrate | Encapsulates ink between clear film and injected plastic for durable graphics |
How do cycle time, robotic hardware, and run volume shape in-mold labeling economics?
Combining decoration with molding cuts total unit cost by eliminating downstream labeling operations, yet placing labels into the open cavity can increase molding cycle time. Because injection molds are expensive to manufacture and can run multi-cavity layouts, IML economics favor mass-production volumes spanning thousands of parts where tooling and changeover overhead are amortized.
Mold tooling investment and multi-cavity scale
Injection molds represent a major capital commitment, which is why injection molding is normally reserved for mass production where thousands of parts are produced. To maximize output per press cycle, a single mold can run multiple cavities of the same part—with extremely high-volume molds such as bottle caps exceeding 128 cavities per shot. Because most label-placement robots are press-independent and compatible with modern fast-clamping machines, high-volume converters can integrate IML automation across existing presses without dedicating a single press model exclusively to one robot architecture.
Thin-wall shrinkage, draft, and defect prevention
Thin-walled injection-molded containers require careful coordination between part draft angle, wall thickness, and cooling shrinkage. When the molded skin is too thin or draft is insufficient for expected shrinkage, the cooling part tends to shrink onto the mold cores and cling during ejection, or it may warp, twist, blister, or crack as the cavity pulls away. Validating draft geometry and cooling behavior alongside label film selection prevents costly scrap before committing to multi-cavity production tooling.
What distinguishes pre-printed in-mold labeling from roll-fed in-mold decoration (IMD)?
In-mold labeling embeds the pre-printed label film permanently into the molded plastic wall as an integral part of the container. Roll-fed in-mold decoration instead feeds a continuous carrier film from a supply coil to a take-up roll against a flat mold wall, transferring only dried paint layers onto the part while stripping the carrier film away.
In roll-fed in-mold decoration, the carrier film enters the opened mold with the dried paint layers facing the injection gate. After molten resin fills the cavity, the paint adheres to the plastic part and separates cleanly from the carrier film as the mold opens; the feeder then indexes the carrier film forward to position the next graphic frame. Usually the film feeder mounts on the moving mold half to support clean de-molding. Because bending the carrier film increases wrinkle risk, IMD molds must be built so the back side of the carrier rests against a flat wall, whereas IML film blanks—especially cavitated sandwich films—can wrap contoured container walls and small-radius curves.
| Comparison factor | In-mold labeling (IML) | Roll-fed in-mold decoration (IMD) |
|---|---|---|
| Material left on finished part | Complete pre-printed polymer or paper label fused into wall | Dried paint layers transferred from carrier film |
| Carrier film handling | No separate carrier film stripped away | Continuous carrier wound from supply coil above mold to take-up roll beneath |
| Feed mechanism | Robotic pick-and-place or reel-fed blank insertion | Film feeder typically mounted on moving mold half |
| Mold wall geometry constraint | Supports curved walls and small-radius curves with cavitated film | Back side of carrier film must rest against a flat mold wall to prevent wrinkles |
Frequently Asked Questions
What is in-mold labeling and how does it attach to a container?
In-mold labeling places a pre-printed paper or plastic label inside an open blow-molding, injection-molding, or thermoforming mold before the container is formed. During molding, molten resin or an inflated parison bonds with the label so it becomes an integral part of the finished pre-decorated container.
How does injection molding IML differ from blow molding IML?
Injection molding commonly uses electrostatic charging electrodes to charge the label during robotic transfer so it wraps onto the cavity wall before molten resin fuses with it. Extrusion blow molding uses vacuum and compressed air to hold a label backed with a heat-seal or heat-activated adhesive layer against an inflating parison, eliminating bottle flame treatment.
Are in-mold labeled containers easier to recycle than shrink sleeve or adhesive labels?
When polyolefin label substrates are paired with polyethylene or polypropylene containers, the resulting monomaterial package and molding scrap can be recycled as a whole without removing the label first. By contrast, pressure-sensitive labels use release liners, wet glue adds separate adhesives, and shrink sleeves commonly use PVC or PETG that can affect sorting and reprocessing.
What film thicknesses are used in in-mold labeling?
Standard polypropylene or polystyrene in-mold labels run 15 to 40 micrometres thick. Laminated wear-resistant constructions add a 30 or 40 micrometre protective top film, cavitated sandwich films use a spongy core between two thin solid layers for tight curves, and second-surface electronics IML uses 0.125 to 0.375 mm clear polycarbonate or acrylic.
What is the difference between in-mold labeling (IML) and in-mold decoration (IMD)?
In-mold labeling embeds the printed label substrate permanently into the container wall. Roll-fed in-mold decoration feeds a continuous carrier film from a supply coil to a take-up roll against a flat mold wall, transferring only dried paint layers onto the molded part while stripping the carrier film away when the mold opens.
Sources
- In-mould labelling (Wikipedia)
- In-mould decoration (Wikipedia)
- Label (Wikipedia)
- Blow molding (Wikipedia)
- Injection moulding (Wikipedia)
- Thermoforming (Wikipedia)
- Shrink wrap (Wikipedia)